
Introduction
We recommend installing Windows 11 for the best performance and long term support from Microsoft, but Windows 10 is also supported on Framework Laptops with 11th Gen Intel Core processors. For 12th Gen Intel Core processors, we strongly recommend using Windows 11, as that is what we’ve thoroughly tested and support. You can use Windows 10 Product Keys to activate Windows 11.
Tools
Parts
No parts specified.
-
-
Before installing Windows 10 Home or Pro on your Framework Laptop DIY Edition, make sure you've installed memory, storage, and WiFi. Here is a link to the Framework Laptop DIY Edition Quick Start Guide where we go over all the steps to get started.
-
-
-
Product Key for Windows 10 Home or Pro
-
USB Flash Drive at least 8GB in size
-
Another computer to download the Windows 10 installer from
-
-
Don't forget to install the Driver Bundle after you complete Windows 10 installation. Because the hardware in the Framework Laptop is so new, a fresh Windows install doesn't have the needed drivers.
-
-
-
If you purchased Windows 10 Home or Pro from Framework, log into your Framework account and navigate to Digital Purchases to redeem your Product Key for Windows 10 Home or Pro.
-
Once you redeem your Product Key for Windows 10 Home or Pro you will not be able to return it for a refund.
-
You can always choose to redeem your key and activate Windows after you complete the install, as the installer lets you skip the Product Key entry step.
-
-
-
Download and launch Microsoft's Windows 10 Media Creation Tool.
-
If you navigate to this page from a Linux or Mac system, it'll direct you to download a Windows .iso instead of the Media Creation Tool. We recommend finding a Windows machine instead to create the installer to avoid any issues.
-
On Microsoft's webpage, click on Using the tool to create installation media (USB flash drive, DVD, or ISO file) to install Windows 10 on a different PC, and follow the steps listed there to complete the creation of your installation media.
-
-
-
Power off your Framework Laptop.
-
Plug your bootable USB Flash Drive into your Framework Laptop.
-
Power on your Framework Laptop. If the Storage device installed in your laptop is blank, it will boot directly into the Windows 10 Installer.
-
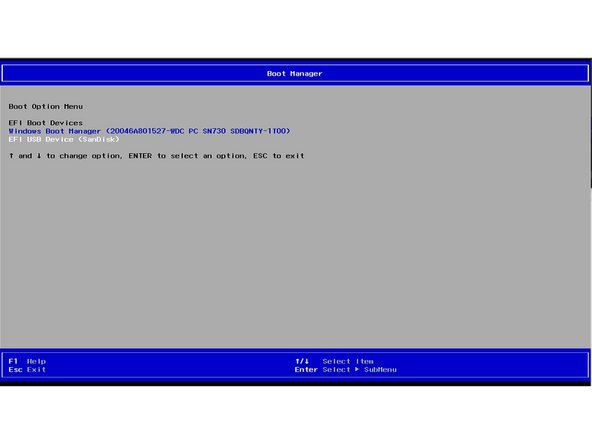
(Optional) If you have an existing operating system installed on the laptop, you'll need to tap F12 repeatedly while booting in order to choose your boot device.
-
That will take you to the BIOS boot selection menu shown in the screenshot. Use your arrow keys to select the boot option for your USB Flash Drive, and then press Enter.
-
-
-
Select the appropriate options from the drop down menu on the first screen, and then click "Install Now" on the second screen.
-
The Windows 10 installer uses a fallback driver for the touchpad, so the touchpad behavior may be somewhat janky. After you complete the installation and install the Framework Laptop Driver Bundle, the touchpad will behave normally.
-
The cursor may not appear until after touching the touchpad for a few seconds. If the cursor still doesn't appear, hard power down the laptop by holding the power button until the system shuts off. Then wait 15 seconds, and power on again. You can also use an external USB mouse to complete the installation.
-
You can enter the Product Key now or click on "I don't have a product key" to enter it after installation is complete.
-
If you are entering a Product Key later, choose the version of Windows 10 you'd like to install. This will usually be "Windows 10 Home" or "Windows 10 Pro".
-
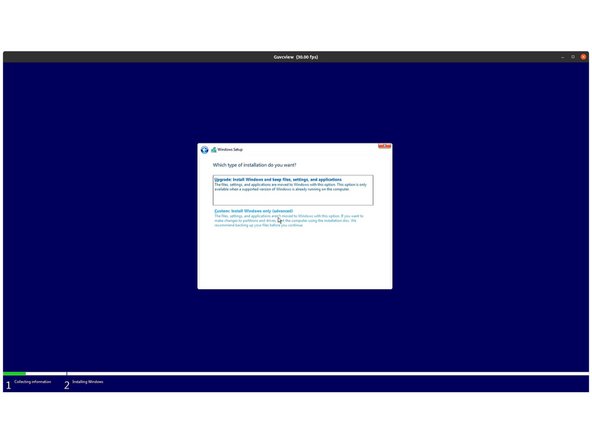
You can then accept the license terms. On the next page, select the Custom: Install Windows only (advanced) option, and Windows will now begin the installation process. Your laptop should restart when complete.
-
If your USB Flash Drive is large, the installer may prompt you to choose which drive to install Windows 10 on. Select the internal drive (typically Drive 0), not the one labelled "ESD".
-
-
-
The installer will reboot and take you through the Windows 10 setup process.
-
If you are using the Intel® Wi-Fi 6E AX210 module your Framework Laptop DIY Edition, Windows 10 doesn't come with the driver by default. You can skip the network setup screen by clicking "I don't have internet," and then connect to a network after installing the Framework Laptop Driver Bundle.
-
Note that if you want to create a local user account instead of logging into a Microsoft Account, you'll need to select "I don't have internet" at the network selection screen. If you connect to a network, the installer will instead ask you to log into a Microsoft Account.
-
If you continue without internet, you'll select "Continue with limited setup" at the next screen.
-
Continue following the on-screen prompts to complete installation.
-
The laptop will then boot into your new Windows 10 installation.
-
-
-
You'll now need to install the Framework Laptop Driver Bundle to get your laptop fully functional.
-
First, download the Framework Laptop Driver Bundle onto a USB Flash Drive. You can use the same one you previously used for Windows 10 installation. You'll need to use another computer for the download if you don't have network access yet on your Framework Laptop.
-
Insert the USB Flash Drive with the Framework Laptop Driver Bundle into your Framework Laptop.
-
Navigate to the folder where the Framework Laptop Driver Bundle is, and double-click on it. Click yes on the "Do you want to allow this app to make changes to your device?" prompt that comes up.
-
The Framework Laptop Driver Bundle will automatically install all of the drivers required to use the Framework Laptop. It will take several minutes to install. At the end of the install, you will be prompted to press any key to reboot. Press any key.
-
After the laptop reboots, you're done! You can connect to a network if you didn't do that earlier, and also Activate Windows if you didn't enter a Product Key during the installation.
-
Make sure to run Windows Update after you're connected to a network to make sure you have the latest security updates. In the future, you'll also be able to get driver and firmware updates through Windows Update.
-
Make sure to update your laptop firmware to the latest available to ensure optimal performance and stability. We also recommend updating your SSD firmware, as we have seen issues on some versions of SN850. Instructions for Western Digital SSD firmware updates are available here.
-


- To purchase a Framework Laptop visit the Framework website
- Want to learn more about the Framework Laptop? Take a look at our blog
- If you have any questions or concerns, feel free to reach out to Framework Support
- To purchase a Framework Laptop visit the Framework website
- Want to learn more about the Framework Laptop? Take a look at our blog
- If you have any questions or concerns, feel free to reach out to Framework Support
Cancel: I did not complete this guide.
23 other people completed this guide.
10 Comments
I had the same problem and using a different usb key fixed it for me. (Was using the Windows tool both times to make the key). Terrible error message.
Edit: Found this article from Intel - Unable to Detect the Drive When Installing a New Windows* OS
Didn’t recognize any compatible drivers so still stuck. I’m guessing this is close though… if the framework drivers weren’t stuck behind a .exe and we should have access to the specific storage driver needed we may be able to fix this?
Duh. My SSD wasn't fully seated. After reinstalling the SSD it works great.
Reformatting the drive didn’t do any better. Note: I did use a Rufus formatted USB installer to start, but have since tried two different USBs with the official method.
P.S. - I posted a couple comments on this page that are repeats, I tried to delete them but the “delete” button doesn’t work.
Yup, I did use the officicial method. I’ll format my USB stick and try it again. Looks like Intel, HP, and Dell all have articles specific to this problem, FYI