Bedazzled – OBW #109

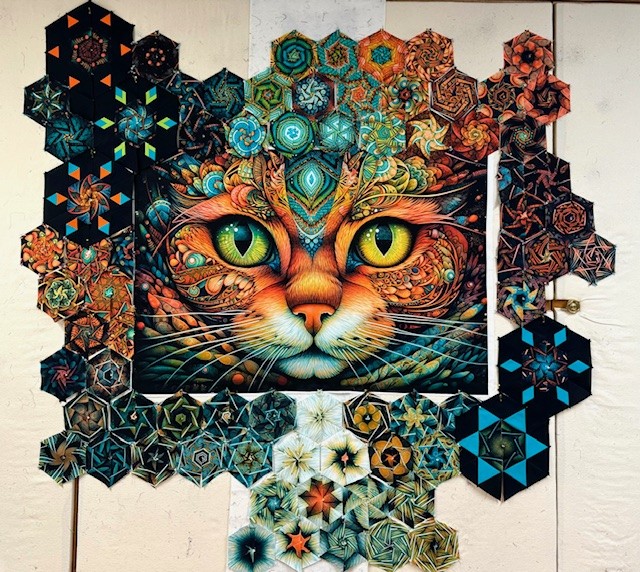
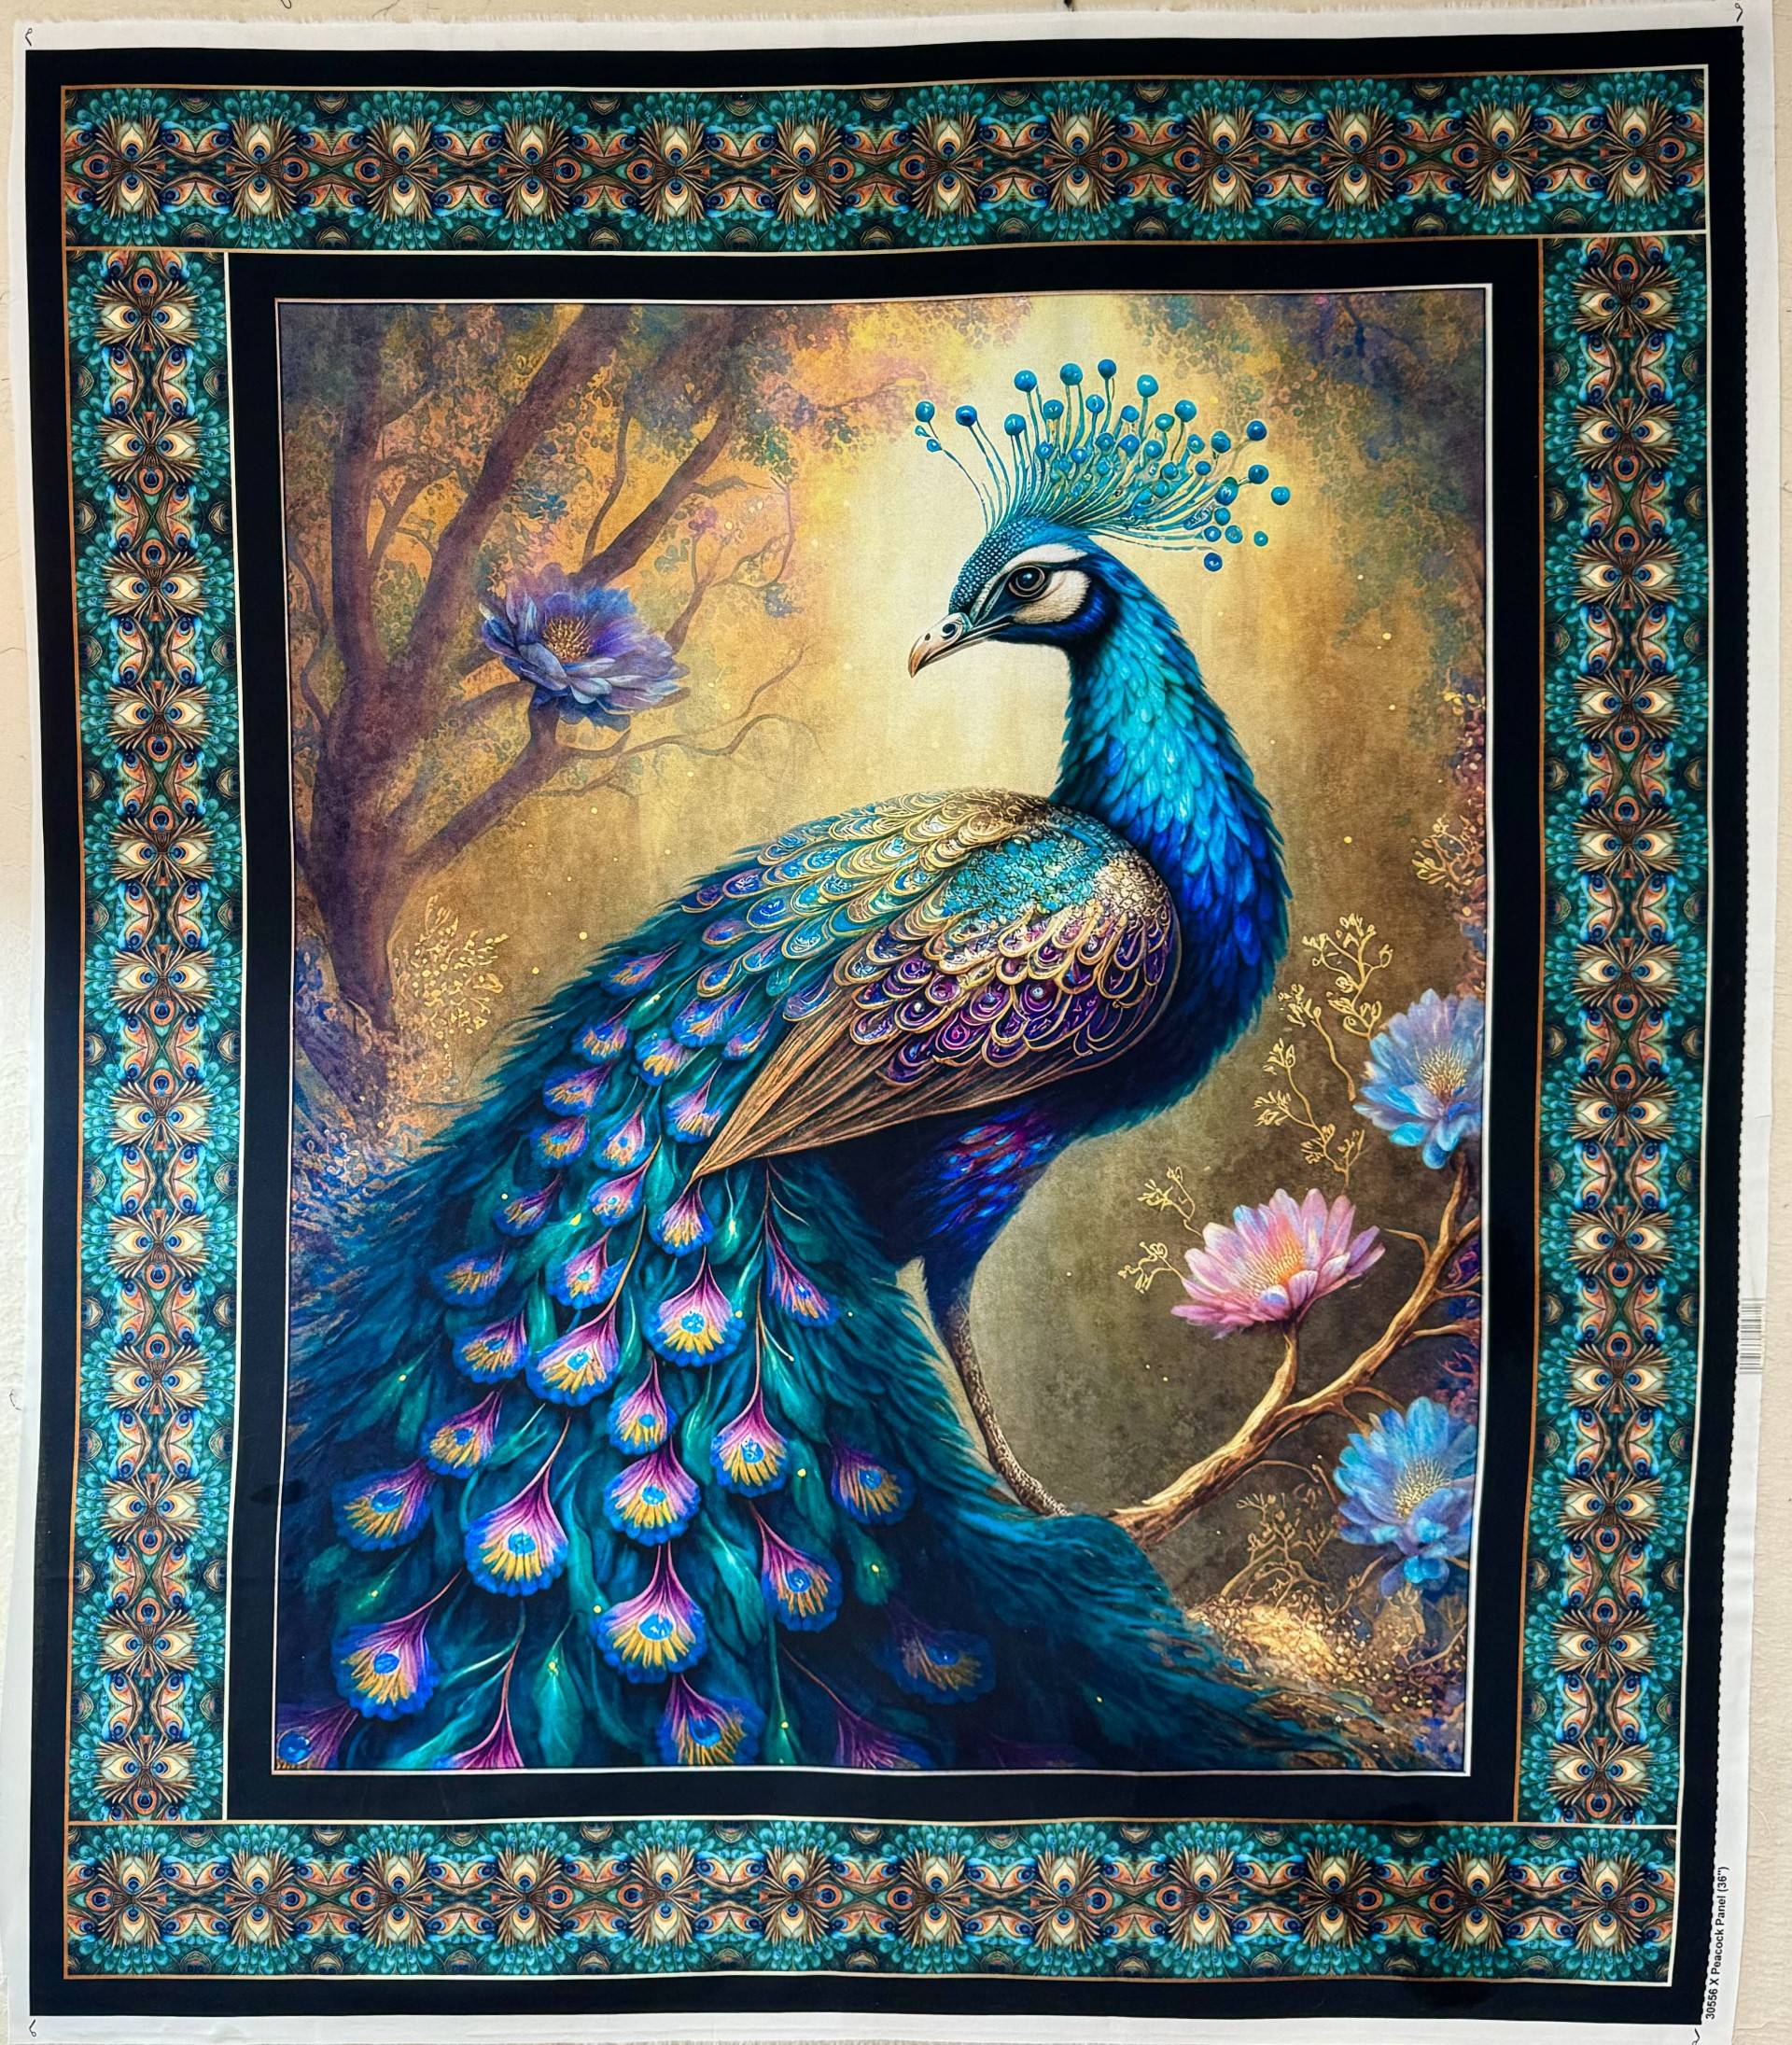
When I saw this panel by Rubin Design Studio “Intricate Illustrated Kitty” of EQuilter, my heart skipped a beat. I just love the colors, the curves and the movement in this panel.

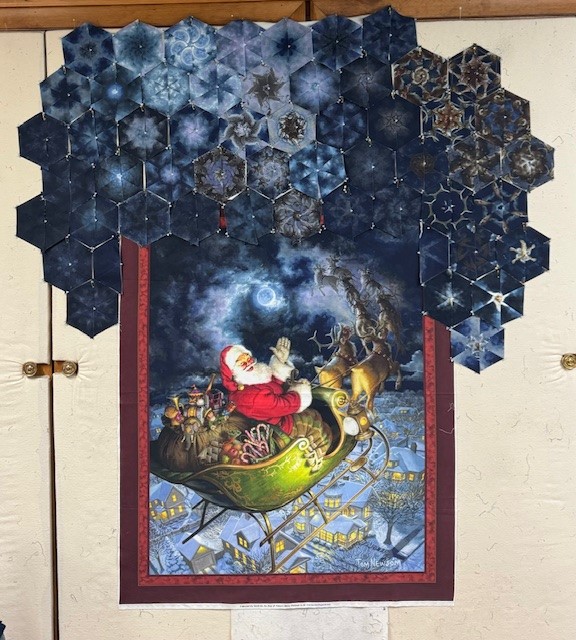
The panel measured 29″ x 43.5″. I could have cut 3.75″ strips for 6″ finished hexies and trimmed the panel to 42″. But, I decided to cut 3.25″ strips for 5″ finished hexies using my Star 60 Ruler. I would need to trim more of the panel, but I felt a smaller strip would make more interesting hexies. There is some stretching with bias edges, but in the end, I only needed to trim 1″ from bothe sides of the panel. I placed the panel in the middle of my design wall and began designing.

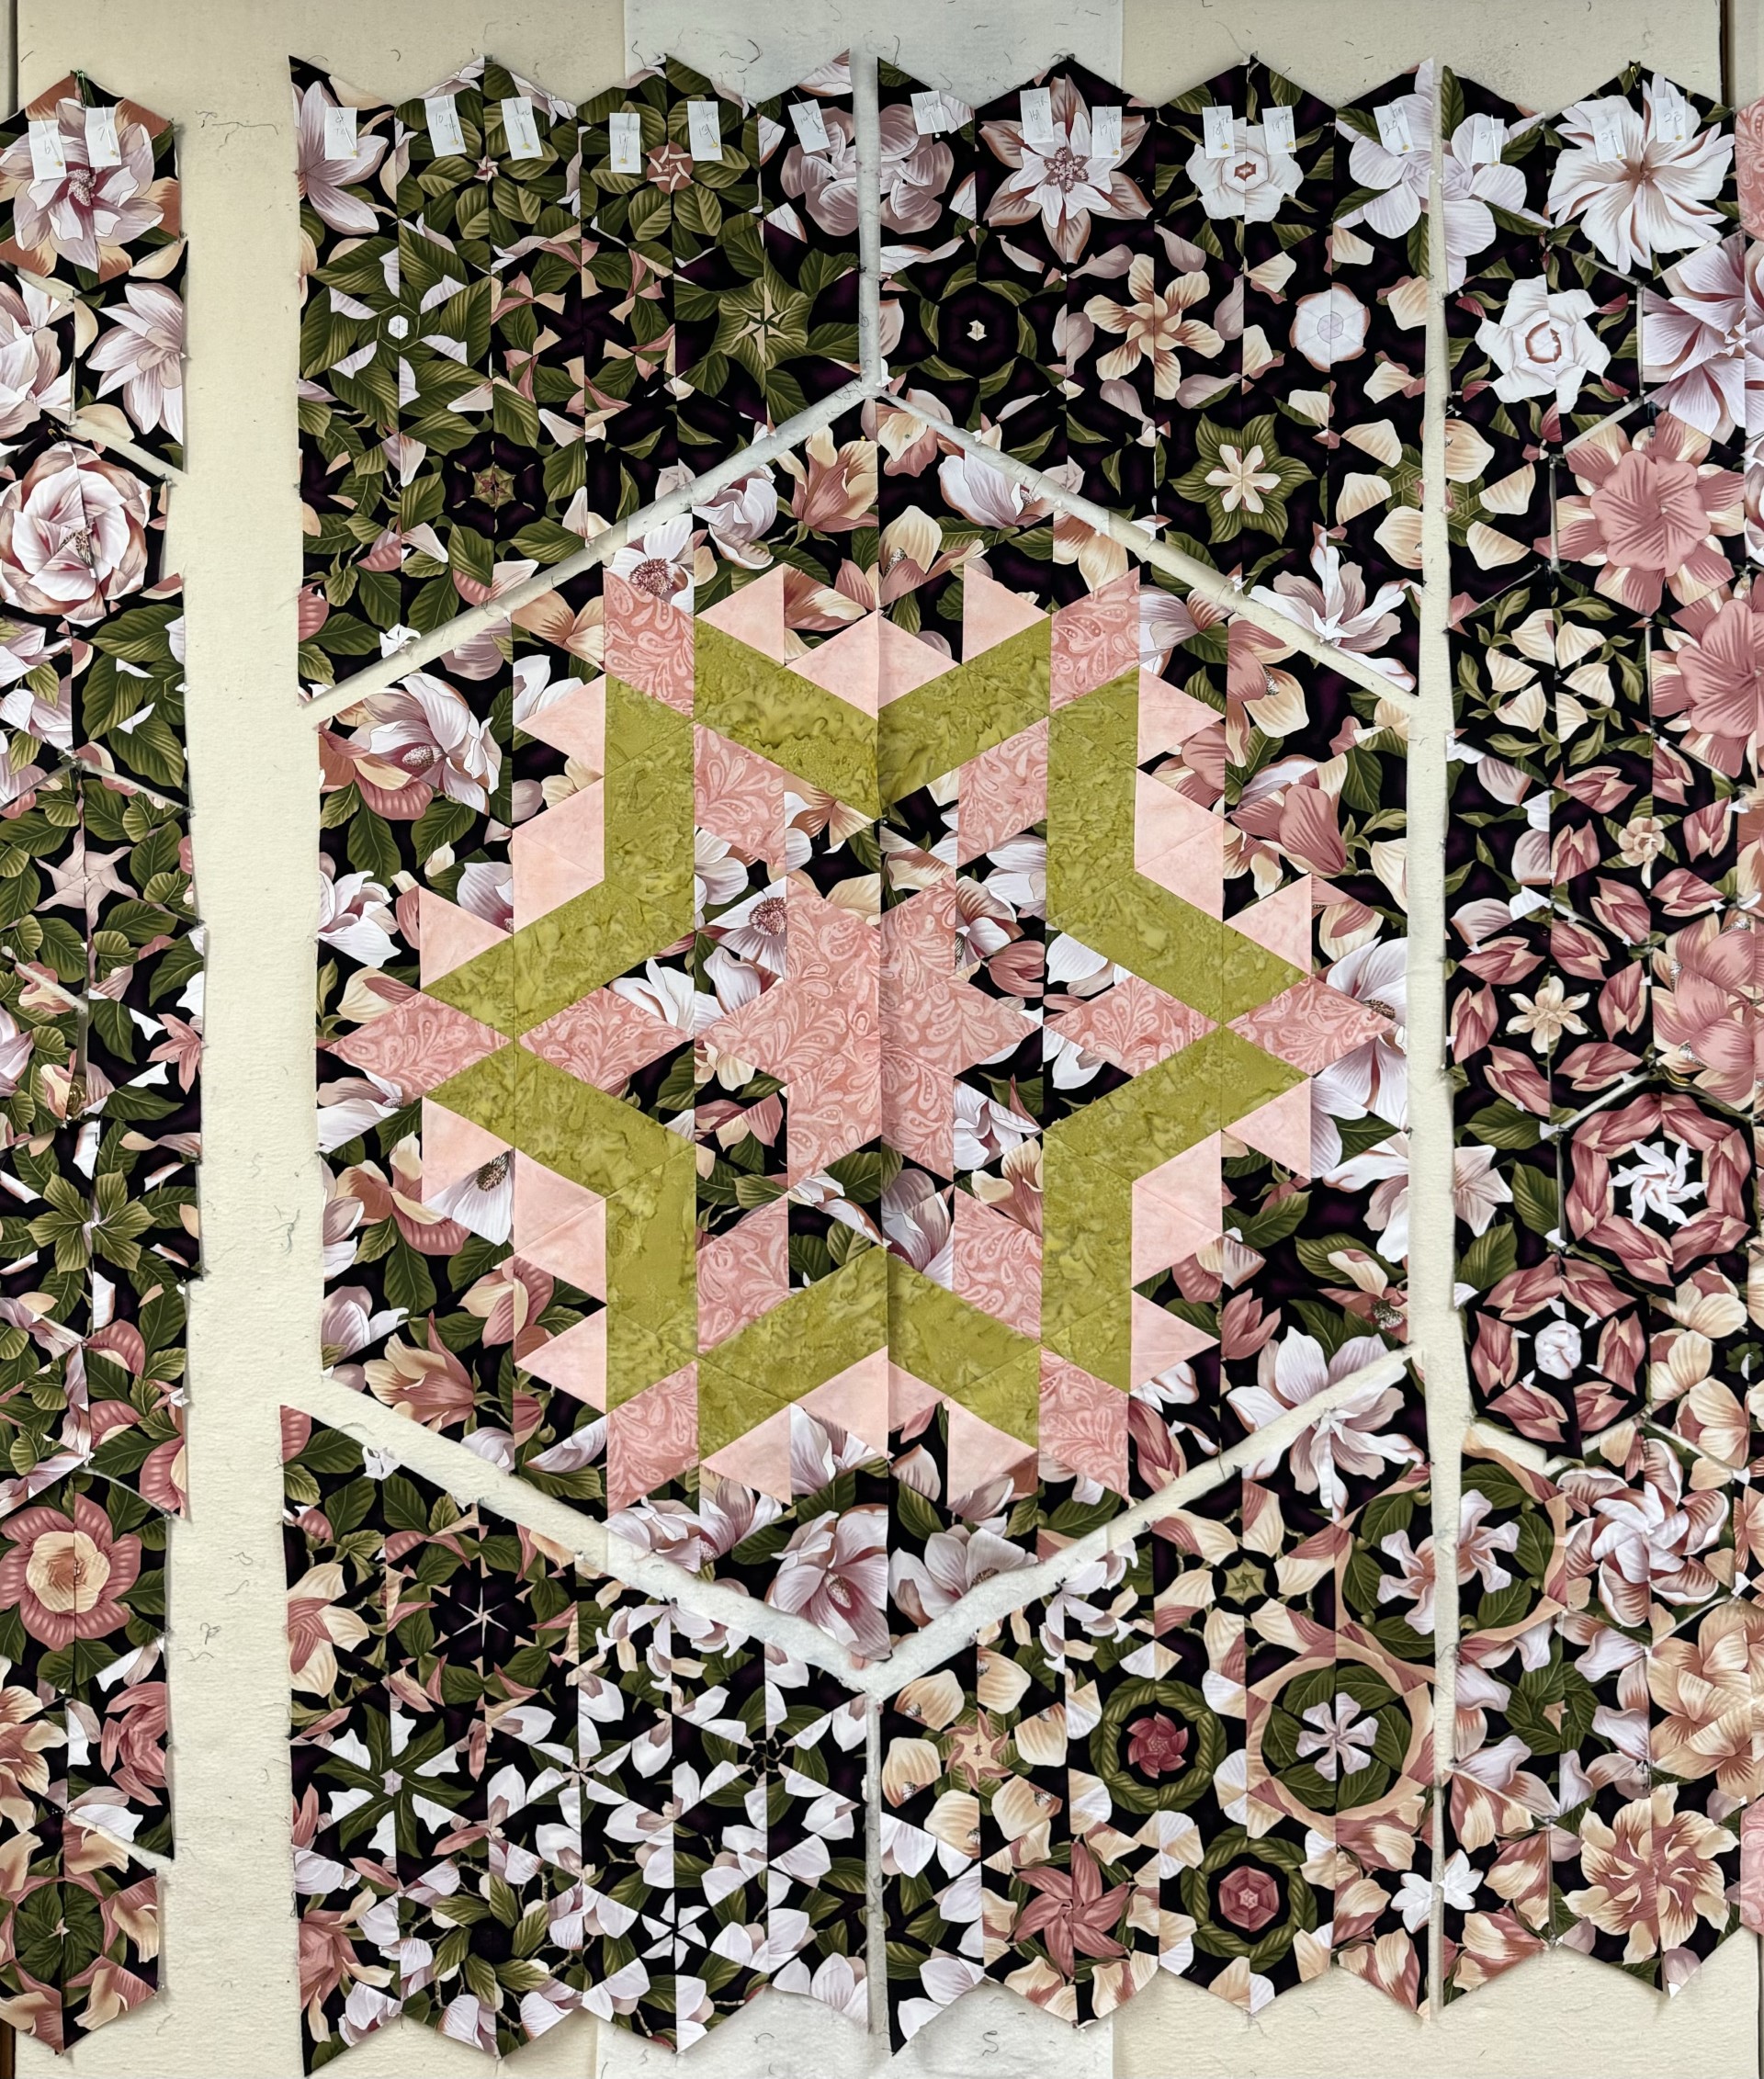
It is always a guessing game when trying to ddecide how far to go past the end of the panel when establishing the bottom row. We know that when we stitch together our hexies, we lose 1/2″ between the seams. But the vertical seams are much harder to calcutlate. The photo above shows the shrinkage, it was abut 3″.

I was playing around trying to find interesting ways for the Star 60 ruler to interact with the hexies. I came up with what I call Star 60 Spinners.

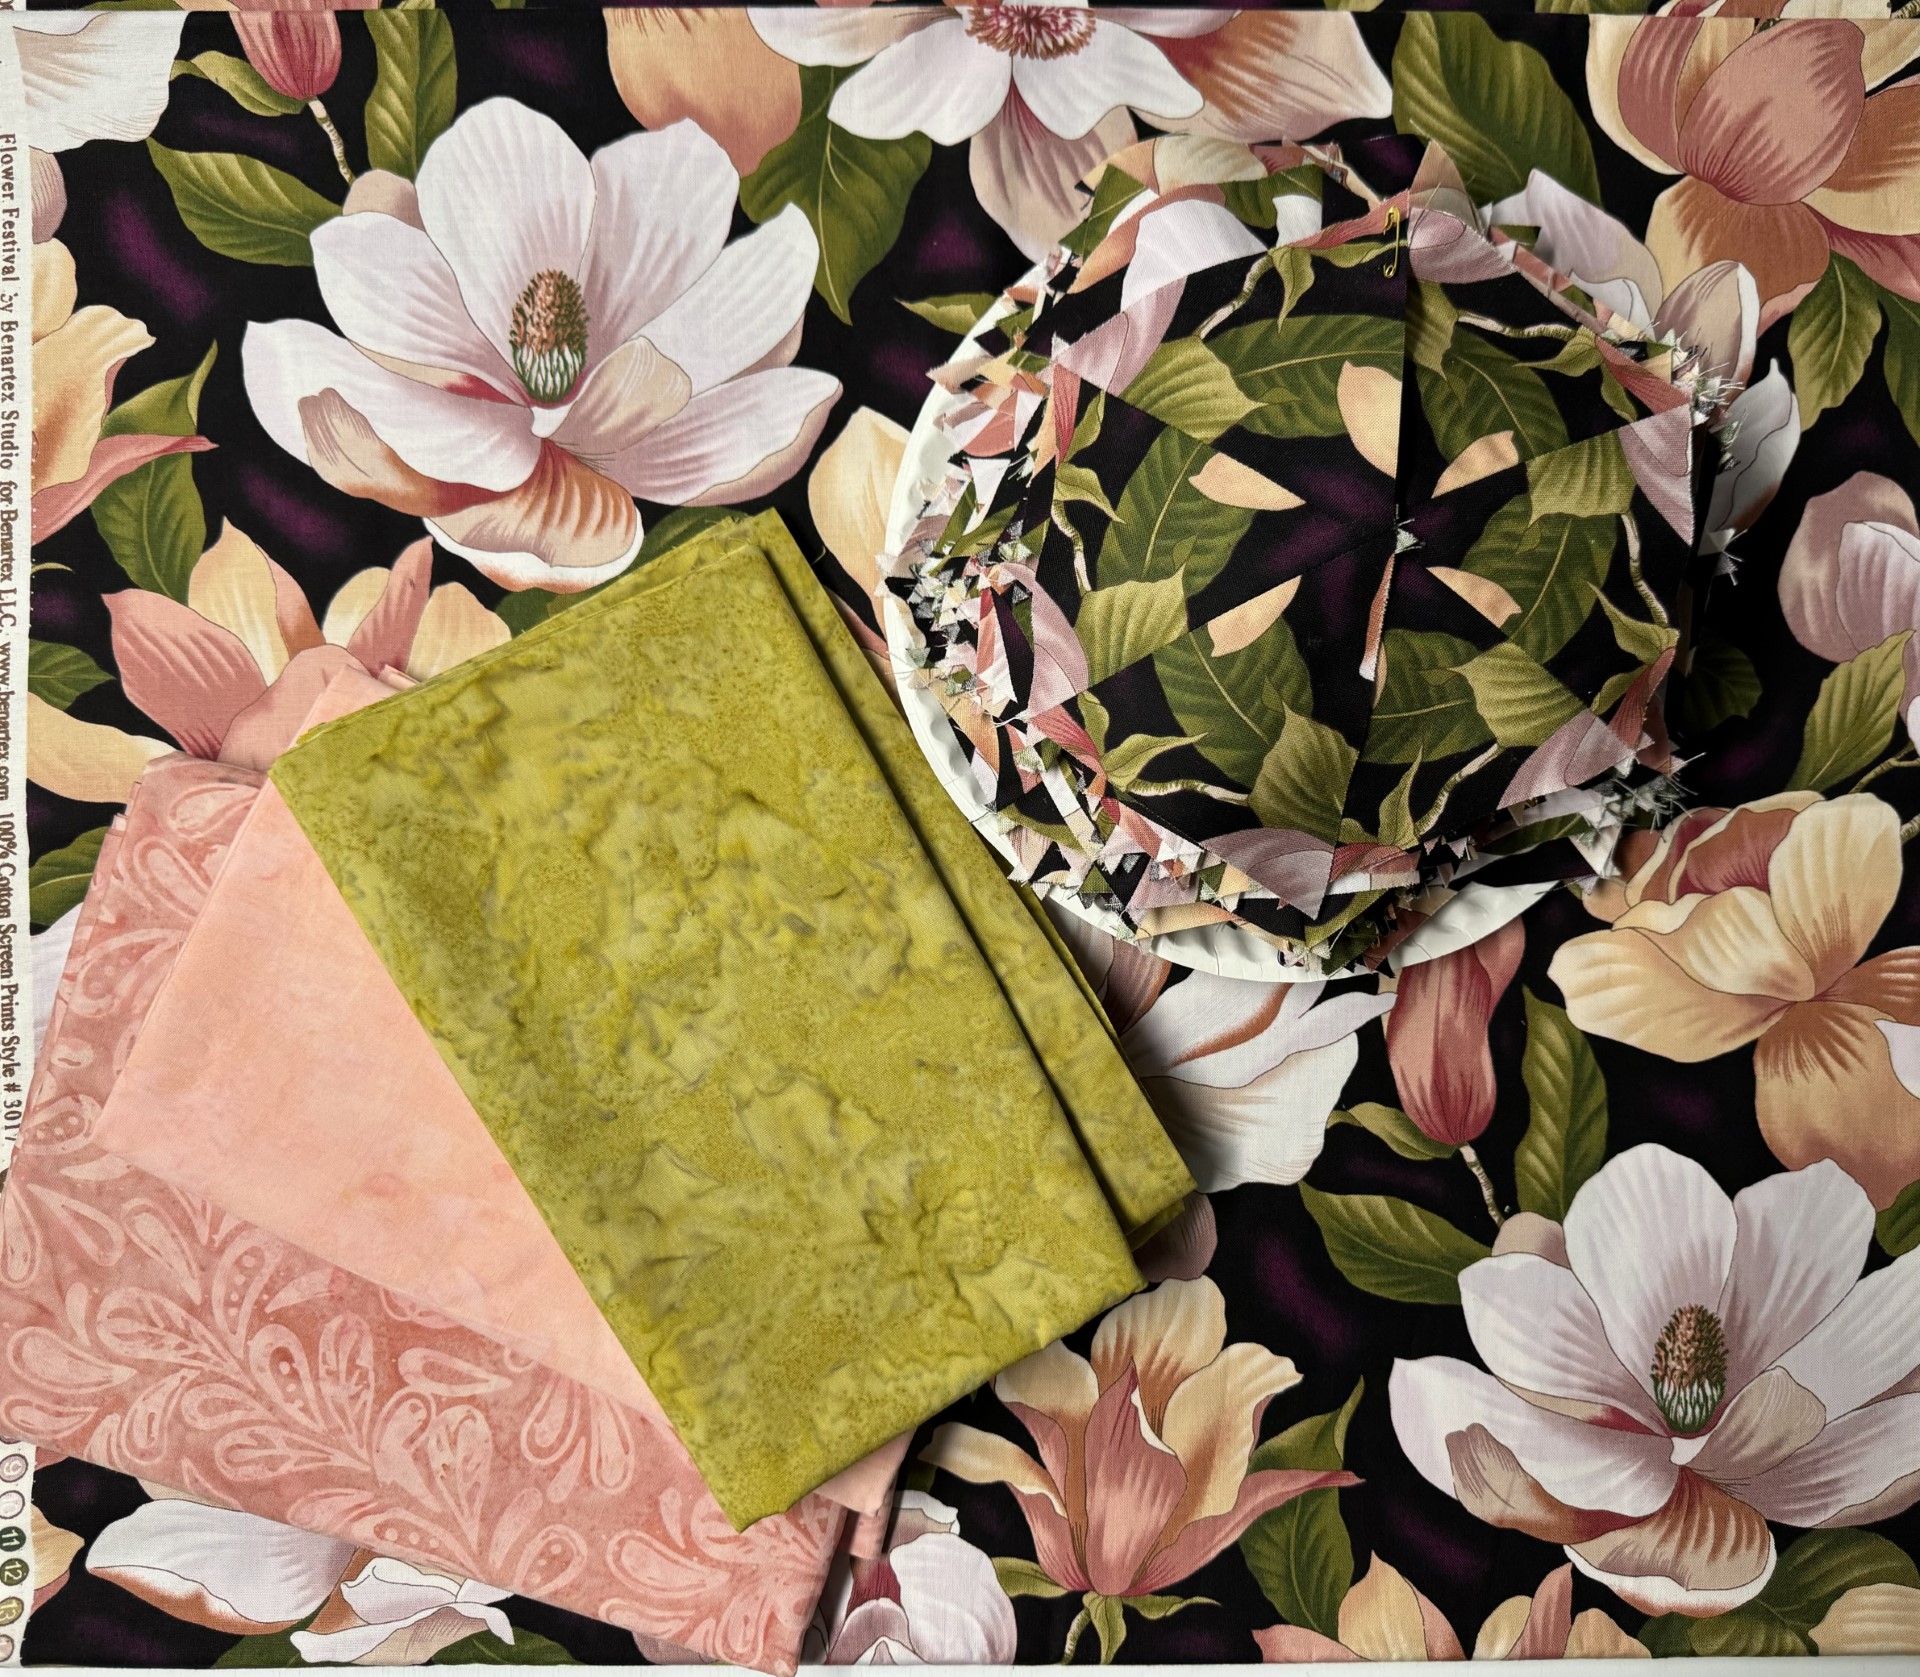
Basic Spinner: You need one hexie (taken apart), and two strips cut the same size as you cut you hexies from. Bedazzled had 5″ finished hexies, cut from 3.25″ strips. I cut one 3.25″ strip for the inner companion triangle and one 3.25″ strip for the side triangles.

With the strip folded, cut 6 sets of 2 side triangles and 3 sets of 2 companion triangles.

Decide what point is going in the center of your hexies, stitch the companion triangle to the opposite edge. Press seams open.

Lay out you side trinagles as shown above on either side of the companion triangle. Stitch the right sides first, then stitch the left sides. Press all seams open.

Construct as you would a hexagon, stitch 2 together, press the seams open then add the third. This made a 10″ finished hexie.

Once I made the Basic Spinner, I knew I could replace the companion triangle with other Star 60 units. I made the units half the size of my 5″ finished hexies. I made 6 – 2.5″ Capped 60, Framed 60, Quad 60 and Star 60 units. I really love these Star 60 Spinners.

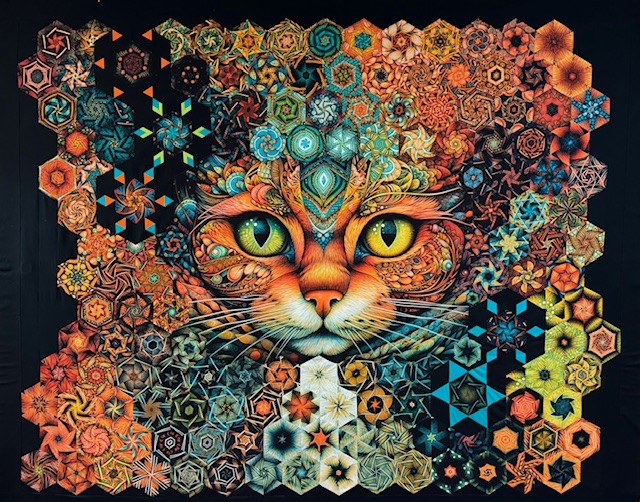
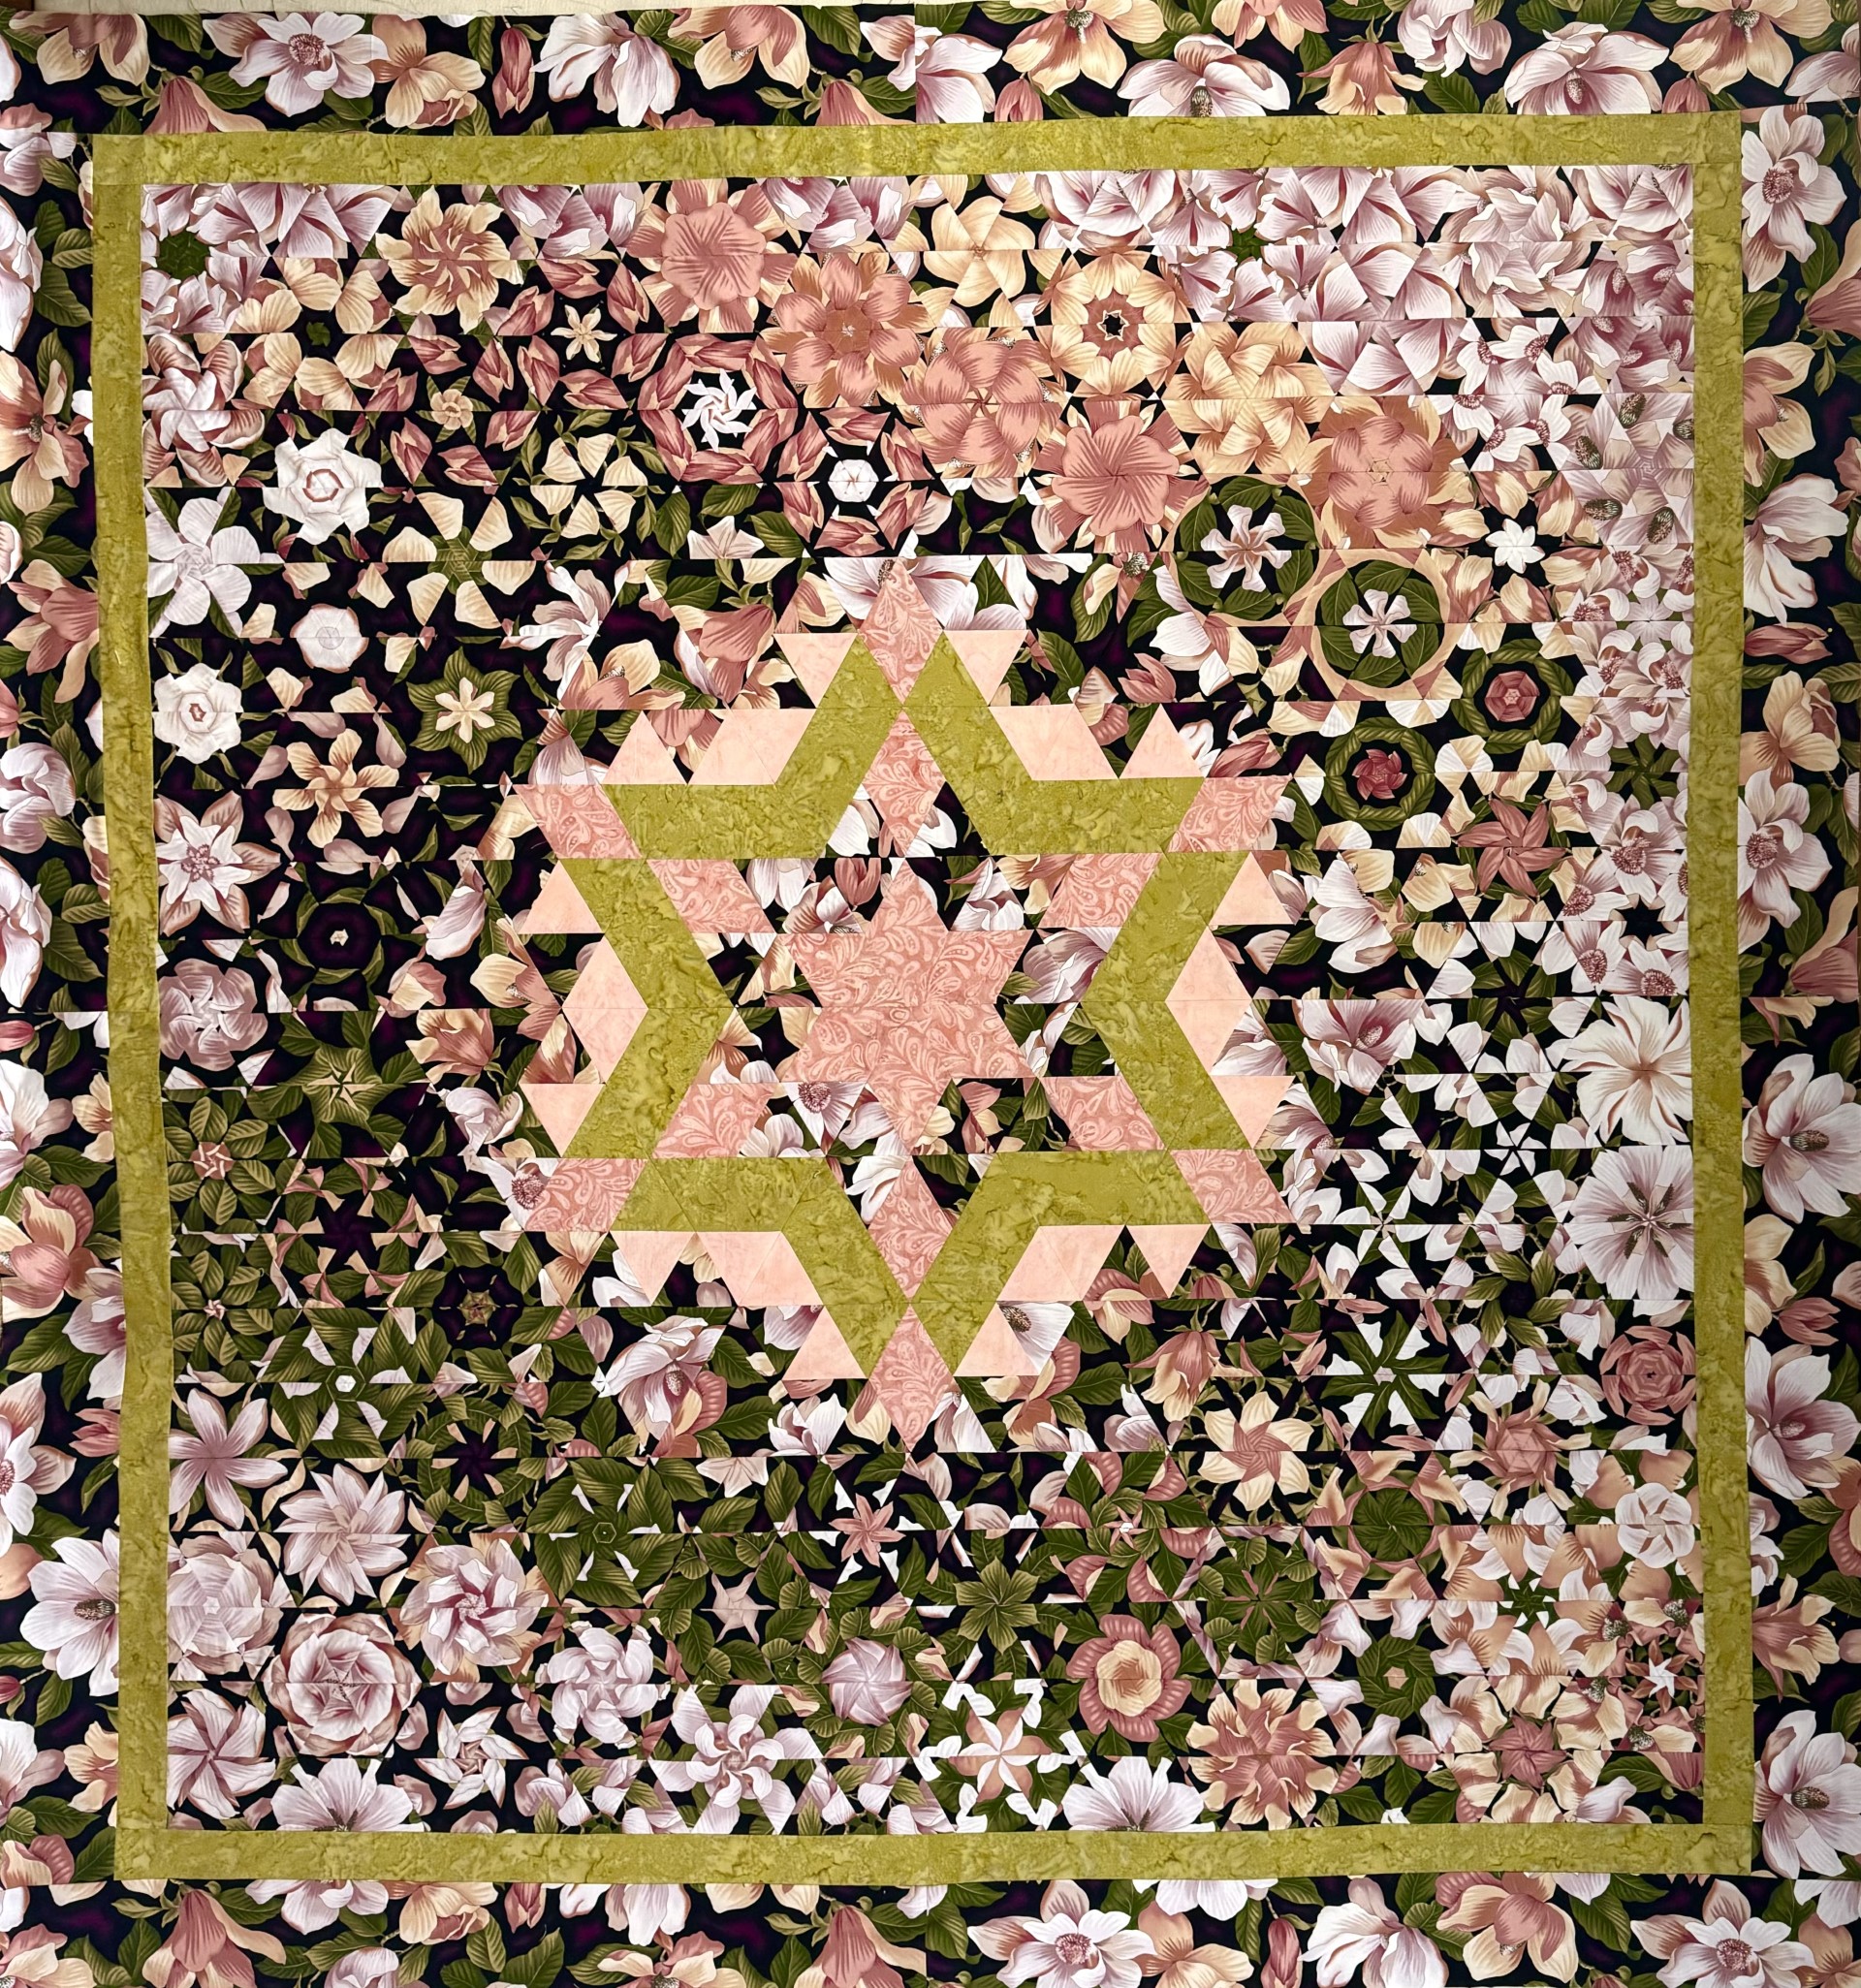
Bedazzled measures 88″ x 71″. To get my uneven curvy sides on my OBW, I use half hexies following the Star 60 instrutions on page 10. Bedazzled is not quilted yet.

@equilter @studio180design #Star60 #Capped60 #Framed60 #Quad60 #studio180design

This is What’s on my Design Wall

I’m having so much fun with this panel from Rubin Design Studio Intricate Illustrated Kitty – Multi – 28″ x 44″ PANEL – DIGITAL.

Stay tuned for colorful updates.

@Equilter #Equilter #Star60 @studio180design

OBW Workshop Retreat April 25 – 28, 2024

There is still time to join me for a One Block Wonder Retreat at the fabulous Strong House Inn, Vergennes, Vermont! Not only will you be papmered by the great food and staff at the Strong House Inn, but you will learn:

  • Identifying and cutting your repeats.
  • Aligning repeats including difficult fabrics.
  • Choosing a ruler and understanding the difference between pointed & blunt tip rulers.
  • Deciding what strip widths to cut.
  • And of course, cutting all your equilateral triangles.
  • Designing with the hexagons.
  • Integrating stars & cubes. What you can make with thr Star 60 Tool.
  • Designing around a panel.

Make your reservations now at the Strong House Inn.

I have been quilting for 20 years. I have been a Studio 180 Design Certified Instructor for 10 years.  Maxine Rosenthal released her book “One Block Wonders” in 2006 – that’s when I made my first OBW.  I have been teaching this process for 18 years.  So far, I have made 108 OBW’s (my friends tell me there is medication for that). Below is the OBW Supply list for you to download.

Playing With My Star 60 Tool

I was at a quilt retreat this weekend with my quilting buddies. I brought plenty of projects to work on, but a local quilt shop had a sale going on so I bought some beautiful fabric.

Shadow Play by Maywood fabrics had a nice light, medium, dark and a great green for a backgound, everyting I needed for Hollow Cube 60’s. I had an idea and wanted to see if it would work.

I love my Star 60 tool by Deb Tucker and I love Hollow Cubes using the Hollow Cube 60 Technique Sheet. I wanted to see if I could fit a circle of 6 – 6″ hollow cubes inside a cirlcle of 6 – 18″ hollow cubes and it worked. I love the look! I bought the fabric on Thursday and made the quilt on Friday! The quilt measures 60″ x 60″.

Next up was a challenge to make a 36″ finished quilt with the main focus using 7 fat quarters of 30’s reproduction fabric.

I decided to use Deb Tucker’s Star 60 Log Cabin Technique Sheet and of course my Star 60 Tool. I chose to add 6 rounds of 1/2″ finished logs for a 27″ finished log cabin star. I added Half Rectangle Triangles using the Star 60 tool instructions to make the hexagon into a rectangle. I added 2″ strips to make it square and added a 2″ border to make it 36″. I love my Star 60 Tool! All together a very productive weekend.

@studio180design @debtucker #studio180design #star60tool

Squiggles, Dots and Lines Blog Hop

Deb Tucker is introducing her newest fabric collection from Island Batik – Squiggles and Dots. I decided to make a small quilt using Deb Tucker’s “Curved Log Cabin Technique Sheet“.

A Curved Log Cabin Block is really an optical illusion. The block is made up of one center square with a series of narrow and wide logs sewn around the center square. It sounds easy, but if you’ve ever tried to make them, you know that it is tough to get them to come out the way you want them – nice and square. Studio 180 Design’s technique has you strip piece each round of logs, then trim with the Tucker Trimmer® III, which allows you to straighten up those edges before you sew the next round. You will make every block quickly, easily, and accurately.

I had 6 – 1/2 yard pieces of Squiggles, Dots and Lines, plus background fanric. I chose to make 36 – 5.5″ finished blocks with 3 rounds of logs.

What is so interesting about the log cabin block is you have many design options.

I fell in love with this version of a Curved Log Cabin quilt. It measures 40″ by 40″. Below are other options I came with.

Check out what my fellow Certified Instructors created:

Monday, March 11 – Tina – https://quiltingaffection.blogspot.com/

Tuesday, March 12 – Jackie – https://ifthesethreadscouldtalk.com/blog-posts/

Wednesday, March 13 – Phyllis – https://www.tuckeruniversity.net/blog.htm

Thursday, March 14 – Diana – https://murgabooquilts.com/

Friday, March 15 – Toni – https://lovepiecedperfection.com/blog

@studio180design #studio180design #curvedlogcabin

QT’s Resplendent & Queen Bee OBW Progress

I wanted to share some of my OBW progress with QT Fabric panels Resplendent and Queen Bee.

QT’s Resplendent panel, measures 36″ by 42″. I decided to cut off the borders. They measured 3.25″ wide. I will save them for the quilt border and for binding. The inside of the panel measured 25 1/4″ wide.

I cut my aligned panels into 7 – 3.25″ strips and 1 – 2″ strip. 

The strips yielded 105 sets of equilateral triangles.

QT’s Queen Bee

QT’s Queen Bee panel measures 36″ x 42″. I decided to cut off the 3.25″ inner border and cut hexies from it. The inside of the panel measured 19 3/4″ wide.

I cut 6 – 3.25″ strips from the aligned panels which will make 5″ finished hexies.

I got 72 sets of equilateral trinagles from the center of the panels and 34 sets of equilateral triangles from the inner borders that will yield 106 hexies.

Stay tuned for more progress reports. @QTFabrics #QTFabrics #Resplendent #QueenBee QT Fabrics

New OBW Panels from QT Fabrics

I have partnered with QT Fabrics and I wanted to share with you two panels they sent me that are coming to your local Quilt Shops Summer 2024! I will be making One Block Wonders with them. I will be [posting my progress here.

@QTFabrics #QTFabrics @Studio180design #studio180design

The Tree Skirt That Wanted to be a Quilt – OBW #106

December is so busy, I haven’t had a chance to do much sewing. Last Summer I decided to take Deb Tucker’s pattern Snow Crystal and put it in the middle of a One Block Wonder (OBW). Snow Crystal is made with the Star 60 Tool.

The fabric is Flower Festival by Benartex. The flowers are about 7″ across. I bought it back in 2022. The background is a dark plum color.

When I started to assemble the quilt when I discovered a problem. I had 3″ too much in the length of the hexie rows that were being attached to the Snow Crystal Center. The Snow Crystal Star finished at 36″, I made my hexies to finish at 6″. 

Friends helped me figure out I had to take out a diagonal row. Sometimes it takes a village! I hadn’t had a chance to get back to it. Yesterday, December 23rd I decided to tackle the problem. I fixed the rows and was able to stitch the quilt together. I hate leaving a quilt with a problem to start the new year. This quilt was on my list to get done in 2023! Although it is not quilted yet, at least it is stitched together.

Flower Festival came out larger than I thought it would, it measures 74″ x 80″. Now I need to get back to baking, there is a peppermint cake waiting to be frosted and rolls to make. Mery Christmas, Happy Holidays everyone.

@studio180design #studio180design @Snowcrystal #snowcrystal @star60tool #star60tool @OBWs #OBWs

Merry Christmas to All – OBW #105

I don’t know about you, but in our house Christmas decorating begins after dinner on Thanksgiving! My house is full of Santa’s & Christmas trees.

I love Santa’s. I had this panel for over a year, but got a chance to work on it before Thanksgiving.

This panel is called “Merry Christmas to All” by Marshall Dry Goods. The inside of the panel measured 29.5″ x 37″. I cut 3.25″ strip for 5″ finished hexies.

The odd width of 29.5″ left me with a 1″ wide red strip I would have to hide later.

I attached the top portion, then I decided to attach the left section first instead of the right. That left me with a 1″ red strip I had to hide. I did that with 3″ finished Hollow Cube 60 units made with my Star 60 Tool by Deb Tucker. I added 5″ Stars in gold to give Santa a destination and to follow the curve of the Reindeer.

I love the colors in this quilt. It reminds of me of going out after dinner to play in the snow and go ice skating at the rink behind my Grandparents house. This quilt measures 70″ x 75″.

Give yourself a gift and join me for a One Block Wonder Retreat at Strong House Inn, Vergennes, Vermont April 25 – 28, 2024.

Besides being pampered by our hosts you will learn about:

  • Identifying and cutting your repeats.
  • Aligning repeats including difficult fabrics.
  • Choosing a ruler and understanding the difference between pointed & blunt tip rulers.
  • Deciding what strip widths to cut
  • And of course, cutting all your equilateral triangles.
  • Designing with the hexagons,
  • Integrating stars & cubes
  • Designing around a panel

Happy Holidays!

Houston Quilt Market 2023

I didn’t get to go Quilt Market but my quilt did! Thank you QT Fabrics. The Creepin it real fabric line will be in shops March 2024. Ask your favorite quilt shop to order your panels now!

This quilt is made entirely from 7 panels by QT Fabrics except for the teal border and the 8 black stars. The stars were made using Studio180 Design’s Star 60 tool.