
Hello, and welcome to my blog! I’m so happy that you dropped by! It’s that time of year again when STAMPtember is upon us. One of the best months of the year! There’s so many new products, and so much inspiration to draw from, not to mention all of the collaboration sets that will debut soon. With the release of all the STAMPtember products, Simon Says Stamp is hosting a huge blog party with codes for free gifts and gifts with purchase! So, be sure to check out all of the blog posts in the party! You can begin the party by starting at Simon’s blog! Check the bottom of this post for my STAMPtember code! For my card today, I’m featuring the new Billow Butterfly, so let’s run through the details.


To begin, I stamped the floral image from the SSS Orchid Rose Bouquet on a panel of Neenah 110lb cardstock using PFS Misty Coast Ink. I chose this ink, because I wanted a very light background that didn’t distract from the focal point of the card. I then trimmed the panel down using the PFS Diagonal Stitched Rectangles, and cut so that the floral image was on the bottom portion of my card panel.
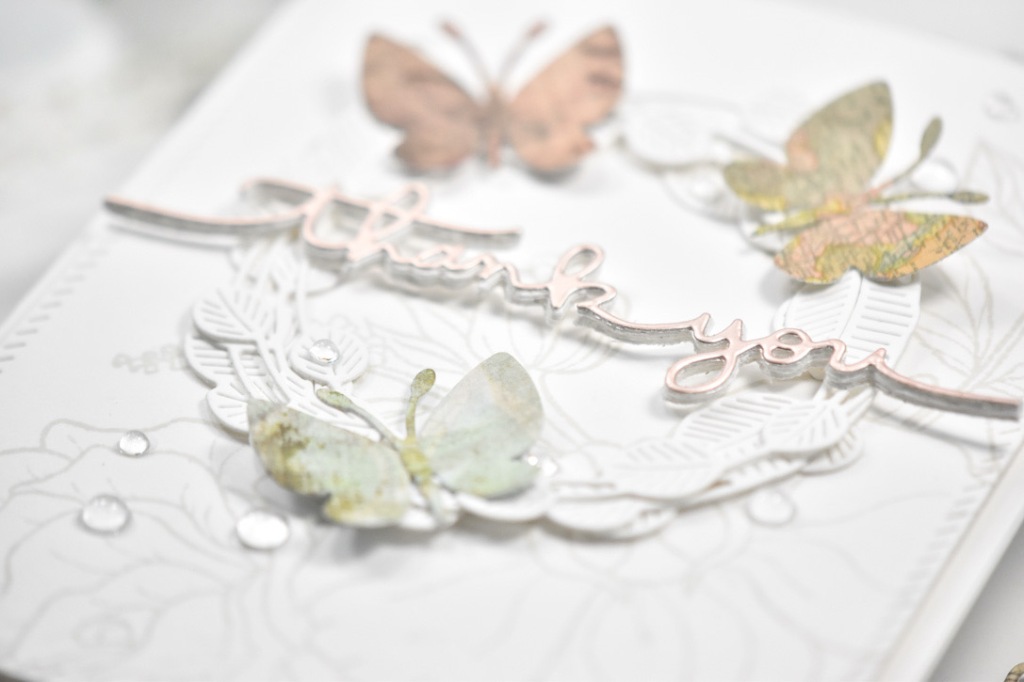
I used the SSS Etched Eucalyptus Wreath and cut three of those from Neenah 110lb cardstock, and adhered them together using liquid glue. Next, I used the new SSS Billow Butterfly to cut some of the butterflies from some scrap Tim Holtz patterned paper that I had hanging around in my stash. This die is super cool, because it’s one piece that cuts several different butterflies, including solid butterflies as well as, outline butterflies. I opted for the solid for this particular project, because I wanted to be able to see the print of the patterned paper. Once the butterflies were cut, I adhered the bodies using liquid glue and moved on to working on the sentiment.
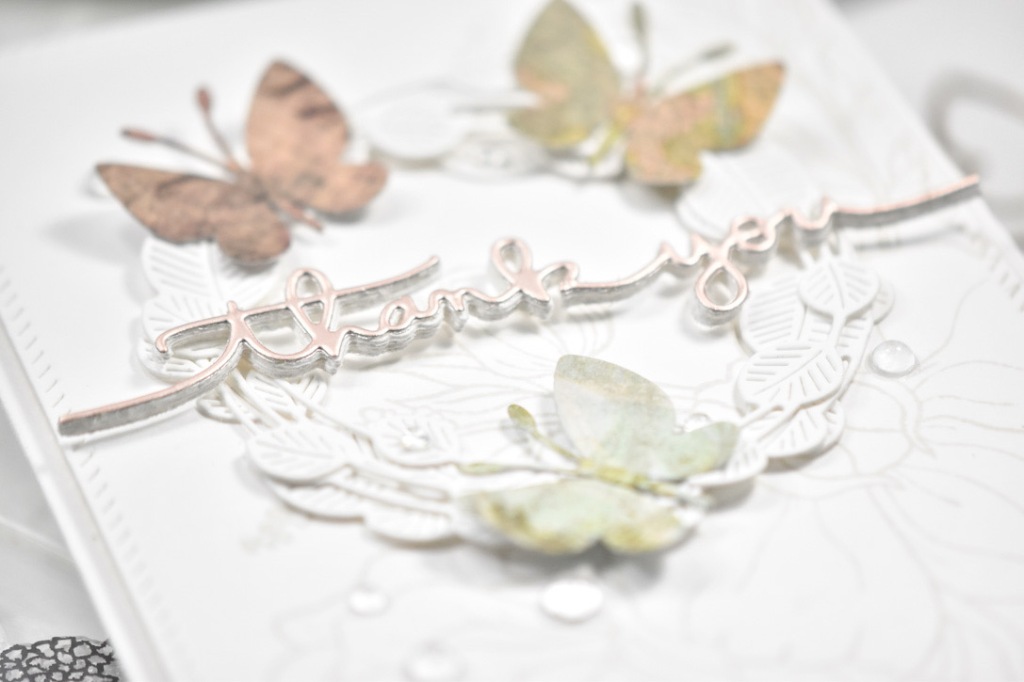
For the sentiment, I used the thank you die, which is from the SSS Handlettered Greetings set. I die cut the sentiment once from Burnished Rose cardstock, and four times from Neenah 110lb, and adhered all of those together. I wanted the sentiment to be thick, so that it would be sturdy.

To assemble the card, I glued the wreath to the stamped panel, and then glued the patterned butterflies atop the wreath. The butterflies are only glued down at the bodies, so that their wings could be curled for added dimension. Once those were in place, I adhered the sentiment only where it comes into contact with the wreath, hence wanting a thicker sentiment for sturdiness. I trimmed off the excess portions of the sentiment and added some clear drops for a little shine. The panel was then adhered to the card base using foam tape.

That does it for this project! I hope you enjoyed it, and I hope it inspires you to get crafty as well. Don’t forget to check out the entire STAMPtember release along with all of the blog posts celebrating this awesome release! Each blog post will have a different code for gifts! Thanks again for stopping by! Have a wonderful day and stay awesome friend!

Supply List:
- SSS Billow Butterfly
- SSS Orchid Rose Bouquet
- SSS Handlettered Greetings
- SSS Etched Eucalyptus Wreath
- SSS Bone Folder
- SSS Triangle Trays
- SSS Place and Score Embellishment Wand
- PFS Diagonal Stitched Rectangles
- PFS Misty Coast Ink
- Tonic Studios Burnished Rose Cardstock
- Neenah Classic Crest Solar White 110lb Cardstock
- Tim Holtz Patterned Paper
- Tim Holtz Scissors
- Studio Katia Clear Drops
- Bearly Art Glue
- 3M Foam Tape
- Misti
- Spellbinders Platinum 6
* Affiliate links used at no cost to you. Thanks so much for your support!
Latest Posts
- Vintage Bits Cards

- Simon Says Stamp Diamond Circle Good Vibes

- Simon Says Stamp Sending Thanks Butterflies

- Simon Says Stamp Striped Just a Note

- Simon Says Stamp In My Thoughts Butterfly

Latest Instagram Posts


Kimberly Perry
The butterfly cut from the map paper is so cute!
LikeLike
tracyware333
Thank you so much Kimberly! I hope you have a wonderful week ahead!
LikeLike
Erica Most
You hade me at tiny butterflies, but the way you made them the focal point is darling.
LikeLike
tracyware333
Thanks so much Erica! It really is a great die, since it cuts several different types of butterflies. I hope you have a wonderful week!
LikeLike
sunshinehoneybee
Wonderful Butterfly creation.
Melissa
“Sunshine HoneyBee”
LikeLike
tracyware333
Thanks so much Melissa! Always such a treat when an idea in your head works out! Hope you have a wonderful week lovely!
LikeLike
Pingback: Simon Says Stamp – STAMPtember® Party – Floral Whimsy – Caly Person
maryredjr
Love this !! So soft and pretty!
LikeLike
tracyware333
Thanks so much Mary! Hope you’re having a fabulous week sweet lady!
LikeLike
Kay Furnish
Die cutting the butterflies out of TH patterned paper was genius – they look great!!
LikeLike
tracyware333
Thanks so much Kay! I really appreciate that! I had the idea, and was so glad when it worked out! I hope you have a fabulous week ahead, and thanks for stopping by!
LikeLike
jinaw
Beautiful card.
LikeLike
tracyware333
Thank you so very much! I hope you have a wonderful week ahead.
LikeLike
Esther
Oh how classy and elegant! I love it!
LikeLike
Toni Kwaiser
Gorgeous!
LikeLike
tracyware333
Thanks so much Toni! Have yourself a fabulous week!
LikeLike
Dorothy A
I love the monochrome card! Beautiful layers!
LikeLike
tracyware333
Thanks so much Dorothy! It’s always a pleasant treat when my ideas actually come together! Hope you have a fabulous week!
LikeLike
Karen Tarolli
I love clean and simple cards!
LikeLike
tracyware333
Thanks so much Karen! I definitely struggle with clean and simple, so I’m always super happy when I can pull it off. Hope you have a fabulous week!
LikeLike
joanberrie13
I enjoyed the muted and delicate card
LikeLike
tracyware333
Thank you so much Joan, I really appreciate that! Have yourself a wonderful week!
LikeLike
gigi1754
Very elegant! I love the muted colours.
LikeLike
tracyware333
Thank you so very much, I really appreciate that! I hope you have a wonderful week, and Happy STAMPtember!
LikeLike
Kim M Jacobs
So beautiful
LikeLike
tracyware333
Thank you so much Kim! Have a wonderful week!
LikeLike
spilor
Dear Tracy –
Hey, girlie! One of your fans here to say GREAT JOB and SO FREAKING GREAT to see you back in a hop lineup!!! I love the card. Its sublety of color, the butterflies and all their symbolism, that gorgeous wreath, the clear droplets…. it all adds up to a beautiful composition. Not only is your card a “10” but you are, as well. Hugs!
Lori S (Spitzer) in PA
LikeLike
tracyware333
Awww Lori, you’re the bestest, and I appreciate you so much! Sometimes the vision in my head doesn’t always make its way to the cardstock, but this one did! I’m so glad that you like it! I hope you have a wonderful week sweet lady! Love you!
LikeLike
Lori Spitzer
😘😘😘😘😘😘
LikeLike
Maureen R
Sooooo Beautiful!! I love the muted colors!!!
LikeLike
tracyware333
Thanks so much Maureen! I hope you are doing well and having a great week girlie!
LikeLike
Ginger
Such a pretty and elegant card. I love that it’s predominantly white with just a little muted color on the butterflies. Well done !!
LikeLike
tracyware333
Thanks so much Ginger! It’s not often that the vision in my head correlates to the paper, so it’s always nice when it does. Hope you have a great week!
LikeLike
beccab33324
How very elegant in the soft muted tones of the pattern papers. Love all the layers and dimension. So pretty!
LikeLike